Country as 3D model
Last Update: 18.03.2025While creating some 3D models, I wanted to have a model of the country I live in, so I can print a landscape version of it. It should be detailed enough to be used for SLA printing, but also suitable for FDM printing.
Starting from this thought I searched for possible sources of geometrical data for countries. The key here is the right keyword, namely GIS (geographic information system). With this I found the open source tool QGIS. This let me load, view and edit geographic data.
The GIS data I found most usable at the moment is the GMTED2010, which has various data grids available for download.
To be able to limit the data to the country I wanted, I needed to get the border of the country in geographical form. This I found at GADM.
Manual steps
Now I had everything I needed to create the first 3D model based in the data with QGIS by hand.
So, in QGIS I started from an empty project and added the first Layer via Layer -> Add Layer -> Add Raster Layer and selected the file ds75_grd\prj.adf as data source. I selected this as it did the systematic subsampling of the data but still had a resolution of 7.5 arc-seconds. To get a better feeling for this number: Earth’s diameter is about , so on an ideal sphere the would be
Thus, a height information change every 232 m.
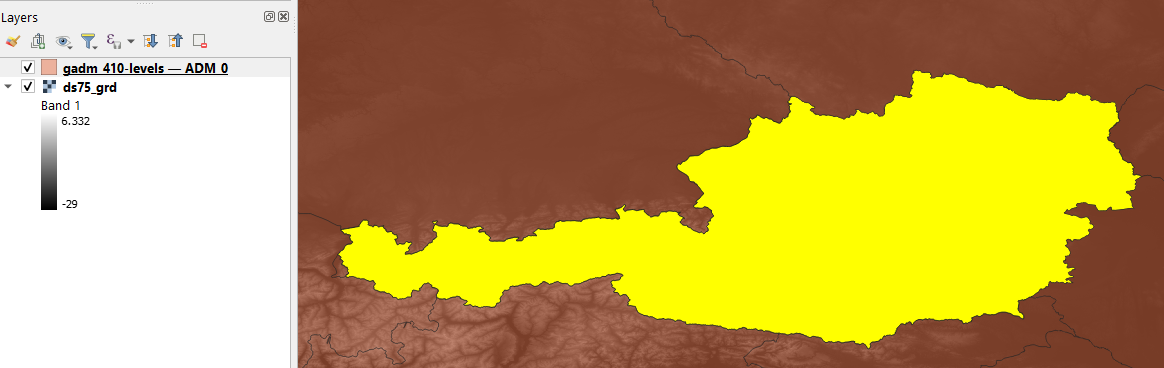
The second layer I needed to add is the country layer. Again via menu, but this time Layer -> Add Layer -> Add Vector Layer with the file gadm_410-levels.gpkg. From the levels in this container, I only imported the ADM_0 to only get the country borders.
To extract only the height information for the country I wanted I needed a layer which contains the border information.
So, I first selected the layer containing all borders in the tree view, then activated the feature selection mode via Edit -> Select -> Select Feature(s) and got this view:
From here I created a new layer from this feature via Edit -> Copy Features and Edit -> Paste Features As -> New Vector Layer ....
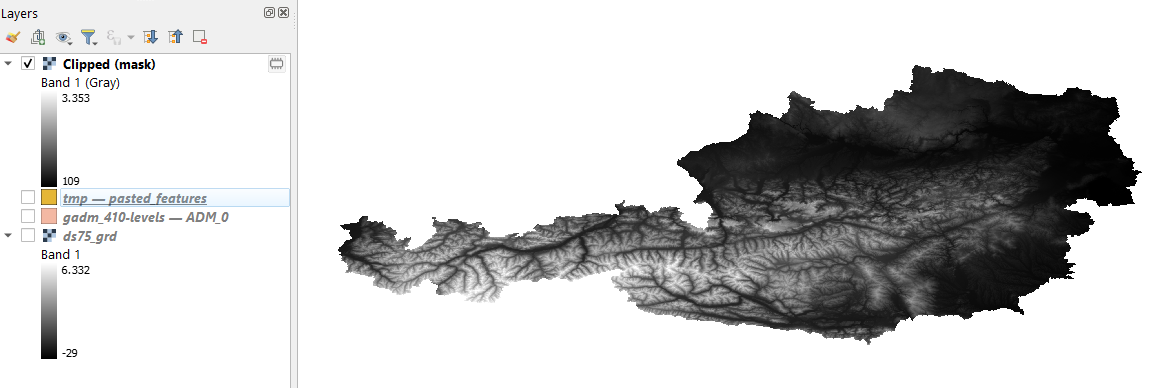
With Raster -> Extraction -> Clip Raster by Mask Layer the raster layer (as input) and the new created vector layer (as mask) can be combined:

With this, the desired information I wanted is available and only needed to be exported to a 3D model:
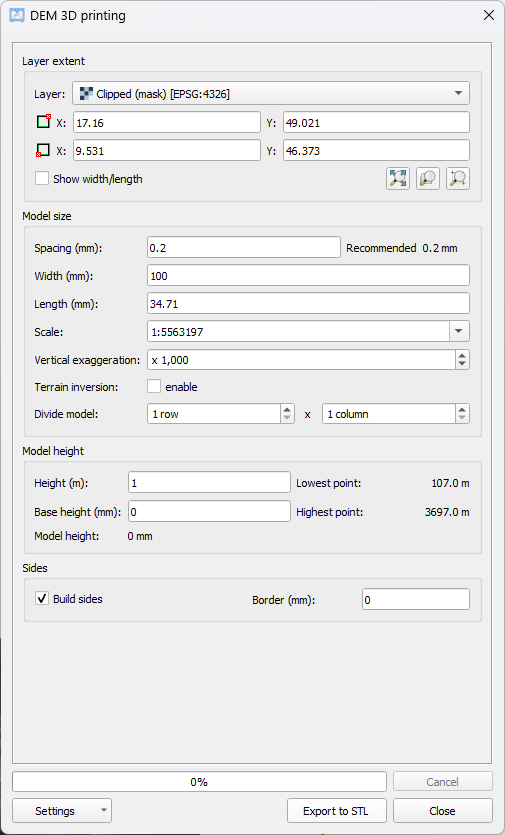
From here I proceeded using the DEMto3D Plugin. After installation it was available in the menu Raster -> DEMto3D -> DEM 3D printing. The plugin allowed me to export the raster layer as STL file, a file perfectly suitable for 3D printing. In the dialog I selected the clipped layer to export, clicked the button “Select full extent” in the “Layer extent” section and filled the rest with meaningful values for 3D printing:
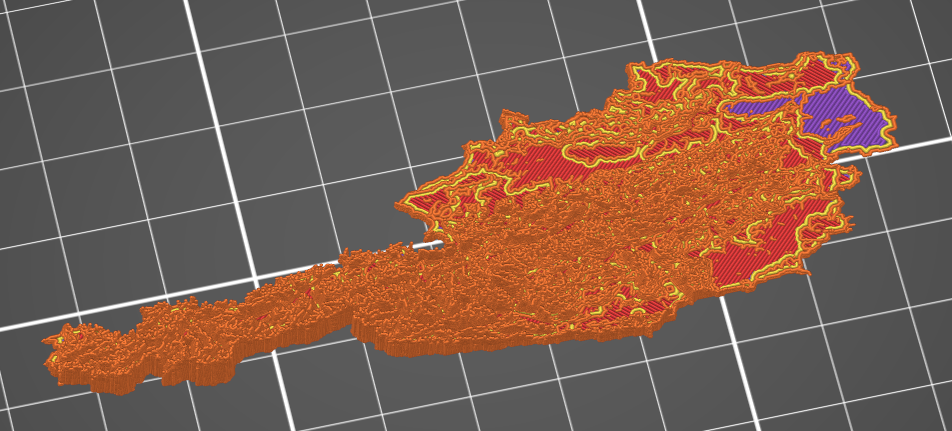
So, I got a 3D printable model as this screenshot from the slicer shows:
Automated script
After a while I though, what if the data sources would be updated and/or I want more than one country as 3D model. So, I made myself familiar with automatization option using QGIS. I found that Python scripting is available.
Using the above manual steps, I knew and the API documentation I came up with the following script to automatically create STL files for all countries (features) in a vector layer. I prepared a file world.qgz with the layers containing the vector and raster information that should be processed and a temporary layer for the processing step. As the template was fixed, I hardcoded the layer names into the script. In case this is different when you want to use parts of the script, just inspect the layers variable in the Python console to get the names.
from qgis.core import QgsProject

from DEMto3D.model_builder.Model_Builder import Model
from DEMto3D.model_builder.STL_Builder import STL
from DEMto3D.DEMto3D_Dialog.DEMto3D_dialog import DEMto3DDialog

folder = 'C:/EarthData/'

project = QgsProject.instance()
project.read(folder + 'world.qgz')
print(project.fileName())

layers = QgsProject.instance().mapLayers()

layer_countries = layers['ADM_0_00ad0572_6e12_4aa6_91ae_896ff87f6b33']
layer_federalStates = layers['ADM_1_8a857091_b016_43fe_b612_c3c3d16eb4c2']
layer_tmp = layers['tmpLayer_13e50322_8049_4b91_b092_d21a2087722f']
layer_geom = layers['ds75_grd_17e45c11_dd82_4ffb_841c_d347b36b28c2']


n = 0
for feature in layer_countries.getFeatures():
    # print country that is currently processed:
    countryName = feature.attribute(2)
    print(countryName)
    # Extract feature to separate VectorLayer
    cur_dataProvider = layer_tmp.dataProvider()
    cur_dataProvider.truncate()
    cur_dataProvider.addFeature(feature)

    # Menu: "Raster -> Extraction -> Clip Raster by Mask Layer"
    result = processing.run("gdal:cliprasterbymasklayer",
      {
        'INPUT': layer_geom.dataProvider().dataSourceUri(),
        'MASK': layer_tmp.dataProvider().dataSourceUri(),
        'SOURCE_CRS':None,'TARGET_CRS':None,'TARGET_EXTENT':None,'NODATA':None,'ALPHA_BAND':False,
        'CROP_TO_CUTLINE':True,'KEEP_RESOLUTION':False,'SET_RESOLUTION':False,'X_RESOLUTION':None,
        'Y_RESOLUTION':None,'MULTITHREADING':False,'OPTIONS':'','DATA_TYPE':0,'EXTRA':'',
        'OUTPUT':'TEMPORARY_OUTPUT'
      }
    )

    # add the created layer to the project
    rasterLayer = iface.addRasterLayer(result['OUTPUT'], 'clippedLayer')

    try:
        # export STL
        dlg = DEMto3DDialog(iface)
        # dlg.show()
        dlg.layer = rasterLayer
        dlg.full_extent()
        dlg.ui.SpacingLineEdit.setText('0.2')
        dlg.ui.WidthLineEdit.setText('100')
        dlg.ui.WidthLineEdit.textEdited.emit("")
        dlg.ui.BaseHeightLineEdit.setText('5')
        dlg.ui.BaseModellineEdit.setText('0')

        parameters = dlg.get_parameters()

        stl_filename = "{0}{1:03d}_{2}.stl".format(folder, n, countryName)
        print(stl_filename)

        model = Model(parameters)
        model.run()
        dem_matrix = model.get_model()
        stl = STL(parameters, stl_filename, dem_matrix)
        stl.run()
    except Exception as ex:
        print(ex)

    # cleanup this iteration
    project.removeMapLayer(rasterLayer)

    # prepare for next iteration
    n = n+1
Have fun!